Aeotec Water Sensor 7 Pro
Homeowner Summary
Water damage is one of the most common and costly problems a home can have. The Aeotec Water Sensor 7 Pro is designed to catch leaks within seconds of water contacting the sensor, giving you and your service professional time to act before a small drip becomes a catastrophic flood.
The sensors sit on the floor in high-risk areas — under your water heater, behind your washing machine, beneath kitchen and bathroom sinks, near toilets, and next to your dishwasher. When water touches the sensor's detection probes, it immediately sends a Z-Wave alert to your gateway, and Shipshape sends a push notification to your phone. The service company connected to your home sees the alert too.
The sensor is battery powered, needs no plumbing connections, and your service professional can place it in under a minute per location. There is no maintenance beyond replacing the battery, which Aeotec rates for up to 3 years.
How It Works
The water sensor uses a simple but effective detection method: two metal probes on the bottom of the sensor body sit slightly above the surface it rests on. When water rises to contact both probes simultaneously, it completes an electrical circuit between them (water is conductive). This circuit closure triggers the sensor to immediately send a Z-Wave alarm signal to the hub.
The Aeotec Water Sensor 7 Pro (ZWA019) adds temperature and humidity sensors to the base unit. The temperature reading serves a dual purpose: monitoring ambient temperature near water-prone equipment (useful for detecting freezing conditions that could burst pipes) and providing additional environmental data to SAM.
The sensor uses Z-Wave Plus and supports S2 security. The 7 Pro is part of Aeotec's Gen7 line. The alert signal is sent at the highest Z-Wave priority level, meaning it takes precedence over routine sensor reports in network traffic. The sensor reports as soon as water touches the probe, and once more when the leak stops.
Setup Guide
In most homes, your installer sets up and pairs your leak sensors, so these steps are mainly a reference. They follow Aeotec's Water Sensor 7 Pro user guide.
What's in the box
- The main unit, with its probe
- The cover
- Two large strips of double-sided tape
- Four screws and four wall anchors
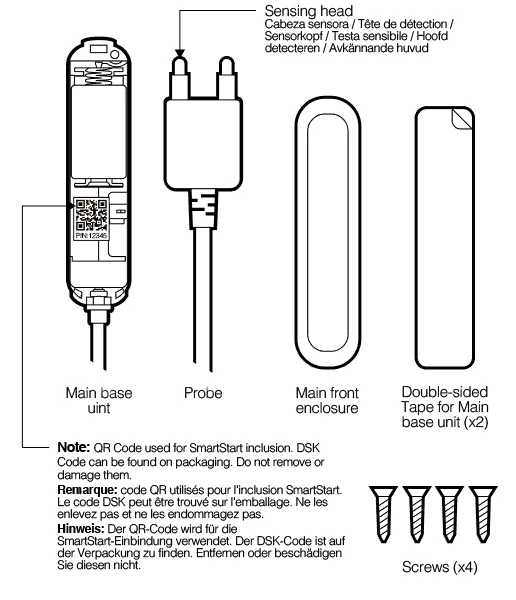
The QR code on the main unit is used for SmartStart pairing, so don't remove or damage it. The DSK security code is printed on the packaging.
Safety
- Keep the sensor and its battery away from open flames, extreme heat and direct sunlight.
- Use only non-rechargeable batteries, and put them in the right way round. The wrong battery can damage the sensor.
- If you store the sensor, take the battery out first. A battery left in can leak and damage it.
- Aeotec rates the sensor for indoor use in dry locations. Keep the main unit out of damp spots; the probe is what goes where water may collect.
- It contains small parts. Keep it away from children.
Install the battery
-
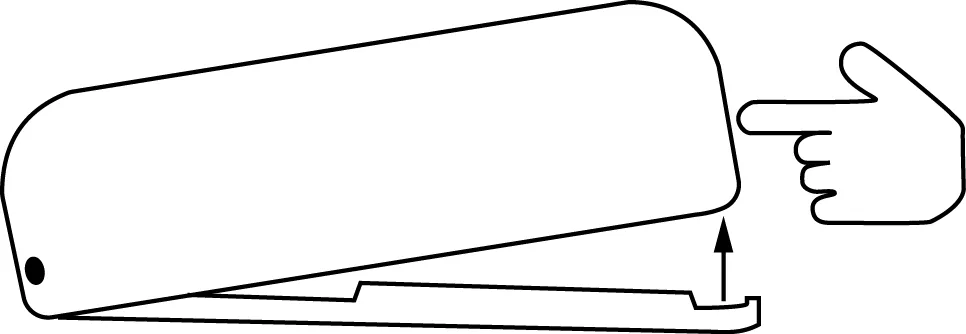
Open the cover: press the clip on the side and pull the cover upward.
-
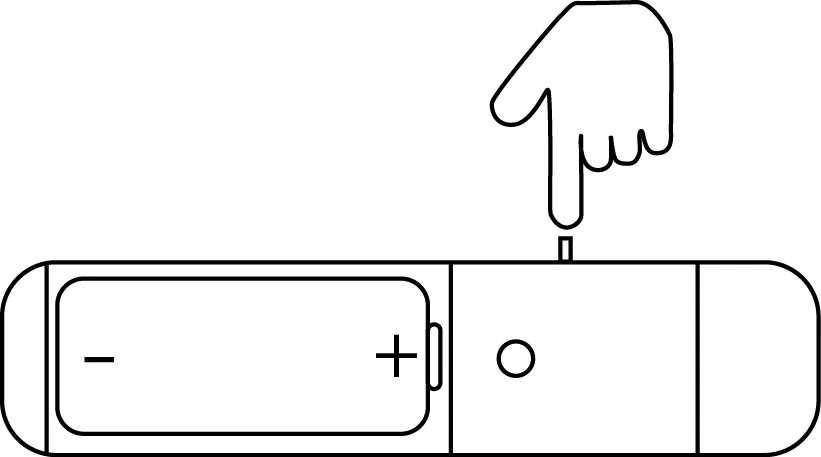
Insert one fresh 1/2 AA size battery, matching the + and − marks. Which battery to buy depends on the sensor's version: see Sensor Battery Life and Replacement.
Pair the sensor
With SmartStart (if the gateway supports it):
- Open the gateway's app and choose SmartStart inclusion.
- Scan the QR code on the sensor.
- Power the sensor. Within 10 minutes it joins the network on its own.
Classic pairing:
-
Put the gateway into pairing mode. During a Shipshape setup, the app tells you when to press the button.
-
Press the tamper switch three times quickly. The LED blinks five times.
-
When pairing finishes, the LED glows green for 3 seconds.
-
If the gateway asks for a security (S2) code, enter the first 5 digits of the DSK.
-
Close the cover.
LED Indicators and Button
LED indicators
| What's happening | What the LED does |
|---|---|
| Battery inserted, sensor not paired to a network | Blinks red for 5 seconds |
| Pairing, unpairing or a settings change worked | Green for 3 seconds |
| Pairing, unpairing or a settings change failed (after 30 seconds) | Red for 3 seconds |
| Factory reset | Blinks red for 5 seconds |
| You press the button once and the battery is low | Blinks red 3 times |
| You press the button once and it senses water | Red for 3 seconds |
| You press the button once and it is dry | Green |
| Cover removed, sensor in range of the gateway | Blinks red once |
| Cover removed, sensor out of range of the gateway | Blinks red 3 times |
Button
The tamper switch inside the cover is also the sensor's only button.
| Press | What it does |
|---|---|
| One short press | Wakes the sensor so it checks in |
| Three short presses | Pairs or unpairs it |
| Hold 5 seconds | Gets ready to reset (the LED shows it is waiting) |
| Hold 5 seconds, let go, hold 5 seconds again | Factory reset |
A factory reset removes the sensor from your network, and it then has to be paired again. Only do it if support asks you to. Before changing the battery, read the button notes in Sensor Battery Life and Replacement.
Placement Guide
Proper placement is critical. Water follows gravity, so sensors should be placed at the lowest point where water would accumulate from a leak.
Priority Placement Locations
- Water heater — Place directly on the floor next to the base of the water heater, on the side where the drain pan overflow would spill. Water heater failures are the single most common source of catastrophic residential water damage.
- Washing machine — Place on the floor behind or beside the washing machine, near the supply hose connections. Burst washing machine hoses cause approximately 250,000 claims per year in the US.
- Under kitchen sink — Place on the cabinet floor beneath the sink basin, near the supply lines and drain connections.
- Under bathroom sinks — Each bathroom sink with supply lines is a potential leak source. Place on the vanity cabinet floor.
- Near toilets — Place on the floor at the base of each toilet, near the supply line connection.
- Dishwasher — Place on the floor in front of or beside the dishwasher, accessible from the front panel gap.
- Basement/utility room — Place near the sump pump, floor drains, or any location where groundwater intrusion has occurred historically.
- HVAC condensate drain — Place beneath the HVAC air handler's condensate drip pan overflow point.
Placement Tips
- Sensors should rest flat on the floor with probes facing down. Do not place on carpet or thick padding that could prevent water from reaching the probes.
- Put the probe in the water's path. Think about where a leak would start and which way the water would run, and place the probe there. Water has to reach both metal contacts for the sensor to detect it.
- Keep the sensor accessible for battery replacement. Avoid burying it behind heavy appliances.
- For areas with irregular floors, use the included adhesive pad to ensure the sensor stays in position and does not tip.
- The probe hangs on a wire (1.62 m, about 5.3 ft, on
-02units; 1.08 m, about 3.5 ft, on originals), so you can fix the sensor body to the wall and put the probe where water would reach it first, such as the base of a water heater. Secure the wire with small adhesive clips so it doesn't get kicked out of position.
Maintenance Guide
DIY (Homeowner)
- Battery replacement: replace the battery when SAM alerts you to low battery.
-02units take a CR14250 or CR2 3V lithium battery, and original units take an ER14250 3.6V. Read the code printed on the one you remove and buy that exact code. See Sensor Battery Life and Replacement. - Test the sensor — Every 6 months, place a damp paper towel across the probes and confirm you receive an alert. Remove the towel and confirm the alert clears.
- Check position — During routine cleaning, verify sensors have not been kicked, shifted, or removed. Confirm they are still in their designated locations.
- Keep probes clean — If you notice mineral buildup on the metal probes (common in areas with hard water), wipe them with a damp cloth. Dirty probes can reduce sensitivity.
Professional
- Annual verification — Test every water sensor during annual service visits, and note the results in the home's Service Records.
- Battery proactive replacement — Replace batteries that are below 40% during service visits rather than waiting for low-battery alerts.
- Assess coverage — Review the home's plumbing layout and confirm all high-risk locations have sensors. Recommend additional sensors for any gaps.
- Check for corrosion — Inspect the probe contacts and battery terminals for corrosion, especially in humid locations like basements.
Warning Signs
- Sensor is no longer reporting to the Shipshape app (dead battery, Z-Wave disconnection, or sensor failure)
- False alarms in dry conditions (condensation buildup, corrosion on probes, or sensor positioned where condensation drips)
- No alert during a known water event (sensor may have been moved or probes are dirty)
- Battery life significantly shorter than expected (sensor in a high-humidity area using extra power for frequent wake-ups)
Pro Detail
Specifications
| Spec | Aeotec Water Sensor 7 Pro (ZWA019) |
|---|---|
| Z-Wave | Plus v2, 700 series (ZGM130S) |
| Security | S2 Authenticated or Unauthenticated |
| Frequency | 908.42 MHz (US/CA) |
| Detection | Dual-probe water contact |
| Probe cable | 1.62 m (5.3 ft) on -02, 1.08 m (3.5 ft) on originals |
| Temperature sensor | Yes: -10 to 65 C (14 to 149 F), +/- 1 C (+/- 1.8 F) |
| Humidity sensor | Yes: 0 to 80% RH, +/- 3% |
| Battery | ½AA cell: CR14250/CR2 (3.0V) on -02, ER14250 (3.6V) on originals |
| Battery life | Up to 3 years |
| Alert type | Z-Wave Alarm (Water): once when wet, once when dry again |
| Range | More than 50 m (164 ft) indoors |
| Operating temp | 0 to 45 C (32 to 113 F) |
| Dimensions | 70 x 13 x 20 mm |
| IP rating | IP20: indoor, dry locations, not water resistant |
The table follows Aeotec's Water Sensor 7 Pro technical specifications and product page.
Z-Wave Configuration Parameters
These are Aeotec's defaults, from its user guide. Your installer's settings may differ.
| Parameter | Size | Default | Range | What it sets |
|---|---|---|---|---|
| 3 | 1 byte | 7 | 0, 1, 2, 4 (add values to combine) | Which events the red LED shows: 1 = water status change, 2 = wake-up (one click), 4 = tampering, 0 = none. Turning them all off can extend battery life. |
| 4 | 1 byte | 0 | 0 or 1 | Z-Wave range test on a double-click of the tamper switch (0 = off, 1 = on) |
| 15 | 2 bytes | 240 | 0, or 30 to 35535 seconds | How often the sensor checks temperature and humidity to decide whether to report (0 = off) |
| 16 | 1 byte | 20 | 0, or 1 to 100 (0.1° steps) | Temperature change that triggers a report (default 2.0°; 0 = off) |
| 17 | 1 byte | 5 | 0, or 1 to 20 % | Humidity change that triggers a report (default 5%; 0 = off) |
| 18 | 2 bytes | 43200 | 0, or 900 to 65535 seconds | Time between periodic reports (default 12 hours; 0 = off) |
| 22 | 1 byte | 1 | 0 or 1 | Also send a Binary Sensor report with each wet/dry report. Keep it on for hubs that don't support Notification reports. |
| 64 | 1 byte | 1 | 1 or 2 | Temperature scale (1 = Celsius, 2 = Fahrenheit) |
| 255 | 4 bytes | 0 | 1 or 1431655765 | 1 resets all parameters to their defaults; 1431655765 (0x55555555) factory resets the sensor |
Parameters 5 to 12 set what the sensor sends to other Z-Wave devices in its association group 2 and the tamper alarm timing. Aeotec's user guide lists them.
Z-Wave Reports
- Water leak: Notification Report, type 0x05, value Wet (0x02) or Dry (0x00).
- Tamper: Notification Report, type Tamper Removed (0x07), value 0x03, when the cover is removed.
- Temperature and humidity: unsolicited Multilevel Sensor Reports, sent on a timer (parameter 18) or when the value changes enough (parameters 16 and 17).
Pairing with Other Z-Wave Hubs
Shipshape homes use the Shipshape gateway (see Pair the sensor). For your own hub, Aeotec has setup guides for Aeotec AutoPilot, Aeotec Smart Home Hub / SmartThings, Home Assistant / Z-Wave JS and Hubitat. Check Aeotec's list of compatible gateways first.
Common Failure Modes
- Probe oxidation — In humid environments, the metal probes can oxidize over years, reducing conductivity. A light cleaning with fine sandpaper restores sensitivity.
- False alarms from condensation — In very humid basements or near HVAC systems, condensation can bridge the probes. Move the probe away from where the condensation drips, and fix its source if you can.
- Battery leakage — If a dead battery is left in the sensor for months in a humid environment, it can leak acid and destroy the circuit board. Replace batteries promptly.
- Displacement — Sensors placed on smooth floors near washing machines can "walk" due to vibration. Use adhesive to secure.
Diagnostic Procedures
- Sensor not alerting on water — Place sensor probes in a shallow dish of water. If no alert after 30 seconds, check battery. If battery is good, clean probes. If still no response, exclude and re-pair. If still no response, replace the sensor.
- False alarms — Inspect the area for condensation, dripping pipes above, or HVAC condensate overflow. If the environment is legitimately dry, check for probe corrosion or damage.
- Temperature reading incorrect — The temperature sensor may read slightly high if the sensor is near a hot water pipe or water heater. This is expected behavior. The 7 Pro has no calibration setting, so move it away from the heat source if the reading matters.
- Alert delay — If alerts take more than 10 seconds to appear on your phone, the issue is likely Z-Wave network latency (too many hops) or cloud processing delay. Adding a range extender near the sensor location reduces Z-Wave latency.
Shipshape Integration
Leak alerts:
- The moment the sensor detects water, Shipshape raises a water leak alert. It is a high-severity alert, sent as a push notification to everyone on the home who has push turned on for High alerts.
- The service company connected to your home sees the alert too.
Freeze alerts:
- The sensor's temperature reading also feeds freeze alerts: freeze risk when it reads 35 to 40 °F for more than an hour, and extreme freeze risk below 35 °F. Both show in the app without a push notification.
Battery and connection:
- When the battery runs low, you get a Low battery alert. See Sensor Battery Life and Replacement.
- If the sensor stops reporting for 15 minutes, the app shows a Sensor is offline alert. It doesn't send a push notification.